Last updated:
How to create quick ballpark estimates for architects?
What’s in this Blog?
- Why architects need to estimate budgets
- How Snaptrude calculates automatic BOM
- The theory behind Snapturde’s automatic calculation
- Calculating BOM for different materials
Why architects need to estimate budgets
The possibilities in architecture are endless. Many a time, we architects find ourselves proposing new and innovative ideas which the client is initially impressed by. But this is often cut short by the client’s limited budget. In most cases, the trigger pull decision of many clients is based on ballpark estimates.
Arriving at an estimate is often a long and tedious process. Traditionally in many offices, it is something that’s left to estimation experts and not directly handled by the architects. During the struggle to meet tight deadlines, the budget factor has been habitually overlooked by architects at initial phases. As a result, the proposed design has to be altered significantly at a later stage to fit into the client’s budget.
Many new-age BIM softwares have devised a solution for this. Construction components can be detailed to a great extent on these software as the model is being built. The BIM software compiles this information and the user can come up with a ballpark estimate in a matter of minutes, following a few simple steps.
This is highly advantageous for architects as they can now be more aware of the cost impact of their design options. It gives them a clear indication of how to tweak their designs to make it more affordable. After a few rounds of trial and error, it is possible to arrive at the best design solutions that fall within the client’s budgetary requirements.
These conscious decisions help save a lot of time and effort over the course of projects. Having made design proposals with data-based budget impact, the clients are happier too.
Here are four simple steps for architects to create a quick ballpark estimate on Snaptrude:
Step1: Create your model

Create your model on Snaptrude
To get started, you will first need to create a BIM model on Snaptrude.
Like all BIM softwares, it is important to enter valid information about your project to get valid results. Make sure your model is to scale, the wall and slab thickness is accurate, the floor height is how you imagine it to be, the overhangs and extensions are in place and you’ve got the door and window dimensions right. The more specific the details of each of these are, the more accurate the budget you calculate is likely to be.
Step2: Add materials to your model

Add materials to your model on Snaptrude
Assigning materials is a key step for estimate calculation. On Snaptrude, the user can add materials to each surface. Snaptrude calculates the Bill of Materials (BOM) from the BIM model based on default materials and finishes. These can be updated by a user ‘by face’ or ‘by object’ to represent how the component will actually be built to get a fairly accurate Bill of Materials.
Apart from those in the Snaptrude database, the user can add their own materials along with its properties. These can easily be altered.
Step 3: Generate a bill of materials

Generate a bill of materials on Snaptrude
The quantity of each material recorded by Snaptrude is visible to us with the click of a button! Click on the palette icon on the top row of icons to see the detailed materials schedule.
Click on the arrows icon on the pop-up to download an excel file of the same.
Step 4: Creating a Ballpark Budget

Generate a bill of materials on Snaptrude
There are a number of factors to be considered while creating a ballpark estimate.
Multiply the quantities derived from the BIM model to the current costs of each material. to arrive at a fairly accurate costs of materials. Add a percentage for labour costs and we have the base budget.
It is also important to add a percentage for contingency charges. This is a financial buffer added to each project. The rates of materials might increase by a considerable amount from the time of initial design to the construction on site. Adding a percentage as contingency charge during initial design helps avoid unforeseen hikes to the budget.
Add up these charges and we have with us a dependable ballpark budget!
The theory behind Snapturde’s automatic calculation
The accuracy of the building materials specified in the BIM model reflects in the accuracy of the Bill of Materials that’s formulated.
The default parameters
Snaptrude calculates the Bill of Materials (BOM) from the BIM model based on some default materials and finishes shown in the figures below:
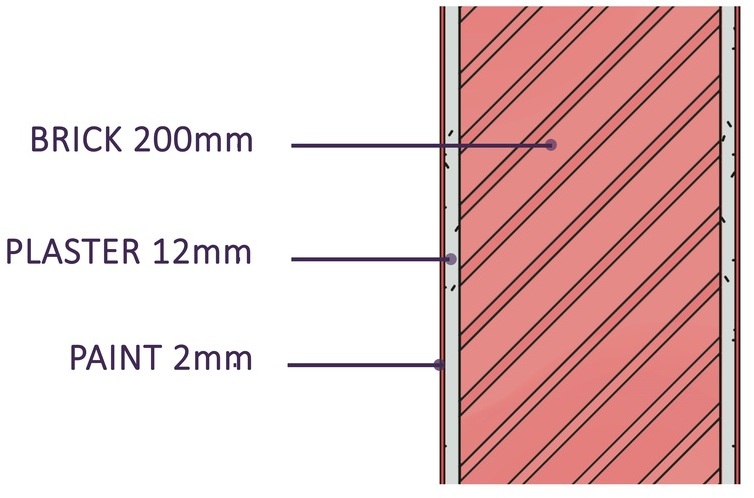
Detail of Wall
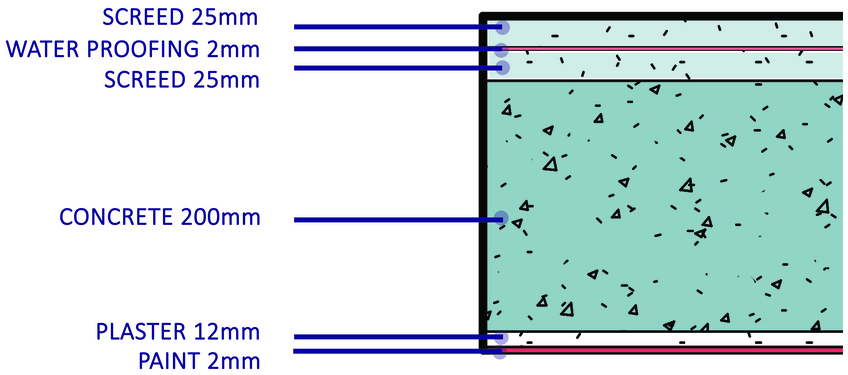
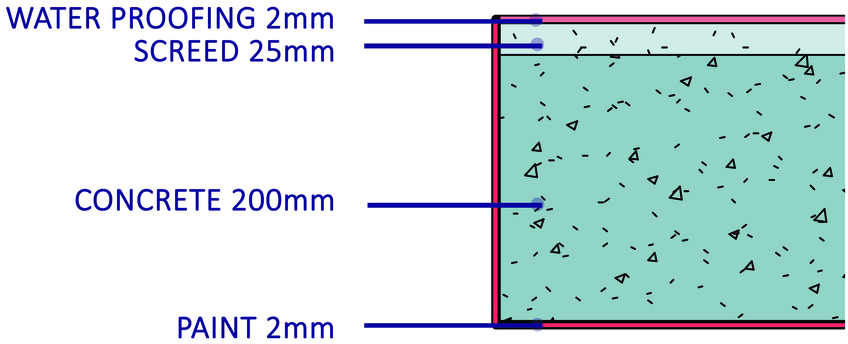
Detail of Roof Slab
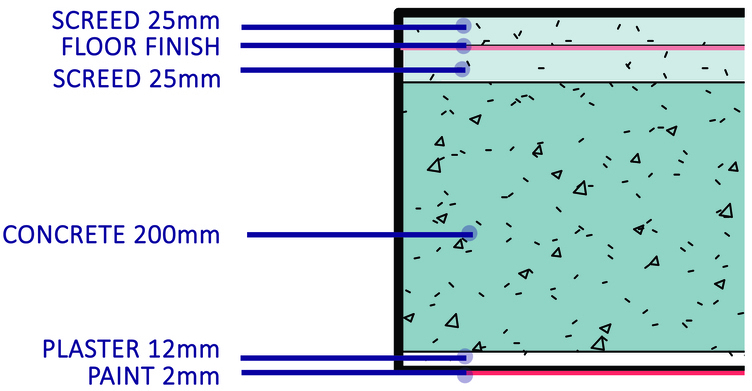
Detail of Intermittent Slab
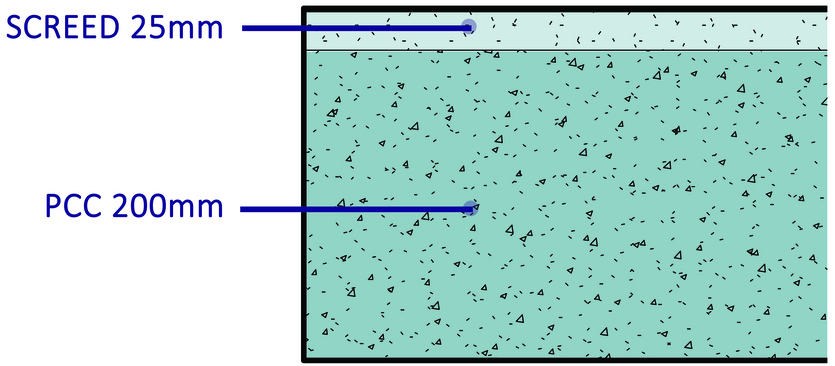
Detail of Grade Slab
Detail of Overhangs or Canopies
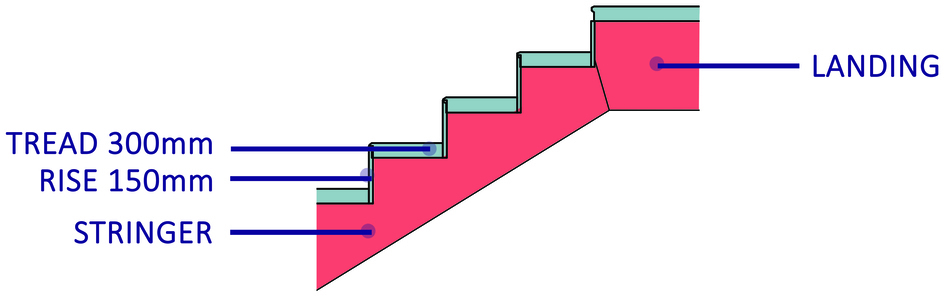
Detail of Staircase
Changing thickness of a material
Snaptrude allows for micro level control on design edits to the user. Using simple select and click actions one can reduce or increase the thickness of material used in residential and other commercial designs within Snaptrude.
How to edit material ‘by face’ or ‘by object’.
The assigned materials can be updated by a user ‘by face’ or ‘by object’.
Generally, they translate to the BIM component in different ways. Changes to ‘Material By Object’ updates the Structure of the BIM component, whereas changes to ‘Material By Face’ updates the Finish of the BIM component. However, there are exceptions to this rule.
The default values are updated whenever a user applies a specific material.
Here’s how the materials can be updated ‘by face’ or ‘by object’:
Calculating BOM for different materials
Snaptrude calculates the BOM for different materials in unique ways. Its properties may vary depending on the location it has been assigned at.
1. Paint
Changing the ‘colour’ on Snaptrude is considered as changing the colour of the paint in finishing. Default Paint is overridden by the specific paint applied. Paint is always considered as a finish material, even when applied By Object or By Face.
In case of slabs, when added, paint is added on top of existing screed finish.
Paint applied as flooring and staircase treads or risers is considered to be coloured oxide flooring.
2.Concrete
When ‘applied by face’ on walls, beams, columns and pergolas, concrete is considered as a textured finish and is included in the BOM as a paint.
When ‘applied by object’ on walls, beams, columns and pergolas, the wall structure is changed. It becomes an exposed concrete wall, and its thickness is increased to 250mm.
In the case of slabs, when ‘applied by face’, when concrete is applied on the top face, the screed finish is overridden as the default structure of the slab is already concrete. If ‘applied by face’ to any other surface, it is considered as a textured finish and the thickness of the slab is unaffected.
As the default structure of slabs is already concrete, when concrete is ‘applied by object’, the slab finishes are removed, creating an exposed concrete slab. The thickness of the slab is unaffected.
When applied on flooring ‘by object’ or ‘by face’, concrete is considered as textured oxide flooring.
When applied ‘by object’ on a staircase , it is considered to be a finishing layer with cement mortar on the stair.
3. Glass
On being ‘applied by object’ on walls and slabs ,the structure is changed to glass of 20mm thickness, with 38mm supports. The quantity of the glass is calculated in square meters.
Glass ‘applied by face’ on walls, slabs, beams, columns or pergolas, is not included in BOM calculation, or updated to the finishes.
Glass applied ‘by face’ in staircases is considered to be of 20mm thickness at treads, landings, risers, soffits and stringers. Glass applied ‘by object’ in staircases is considered to be 20mm thick glass treads with no risers, stringers or soffit fixed on the wall with 5mm metal plates calculated in numbers.
4. Metals
When metal is applied on walls and flooring and ‘applied by object’ on slabs, ‘applied by face’ on beams, columns and pergolas, the structure is changed to a metal framework of 19x19mm with 4mm sheet metal cladding on both sides. Quantities are calculated for both in sqm.
On being ‘Applied by object’ on beams/ columns, metal becomes a steel rectangular section with the dimensions drawn by the user and 25mm thickness. Its quantity is calculated in cubic meters.
Metal applied to slabs ‘by object’ changes the original slab structure to a sheet of metal whose thickness is 4mm, with 38 x 38 mm supports. It is calculated as area, in sqm.
Metal applied on staircases ‘by object’ is considered to be 4mm metal sheet treads with 19 x 19mm supports with no soffit or risers. The metal frame stringer is made of a 19 x 150 mm box section.
Metal applied on staircases ‘by face’ is considered to have treads/ landings made of 4mm metal sheets with 19x19mm sections as supports. The risers are considered to be made of 4mm metal sheets. The stringer beam is considered to be made of a 19x150mm box section whose quantity is calculated in running length. Since a typical metal staircase will not have a soffit, the soffit is considered as non-existent for BOM calculations.
5. Tiles
While being ‘applied by object’ or ‘applied by face’ on walls, beams, columns and pergolas, tile finish is considered as a 12mm cladding fixed with 12mm screed. The tile quantities are calculated as area, and screed in volume.
If ‘applied by face‘ to the roof or to the bottom faces of intermediate slabs, it is considered as a 20mm tile cladding fixed with 19 x 19 mm purlins onto an existing slab. Quantities are calculated for both in sqm.
If tiles are applied to the top face of intermediate or grade slabs, it is not considered in the BOM.
If applied to the roof ‘by object’, it is considered to be a 20mm thick tile roof fixed on 19 x 19 mm purlins. Quantities are calculated for both in square meters. Structural beams needed to support this roof are not included in this calculation. Beams need to be modelled separately and material needs to be applied on it, for inclusion in calculation.
In the case of flooring and staircases, the tread, landing and riser is considered to be made of 25mm thick tile, fixed with 25mm screed. For stringers and soffits, the tile finish is considered as a 12mm cladding fixed with 12mm screed. The quantities for tile is calculated as area, and for screed in volume.
6. Stone
On being ‘applied by object’ on walls, the wall structure is changed to an exposed stone wall of 300mm thickness. Whereas, on being ‘applied by face’ on walls, beams, columns and pergolas, the stone finish is considered as a 19mm cladding fixed with 12mm screed.
Stone applied ‘by object’ or ‘by face’ on slabs are considered to be 12mm stone tiles fixed with 19 x 19 mm purlins onto an existing slab. Beams are excluded in this case.
Stone applied on flooring is considered to be 25mm thick stone flooring, fixed with 25mm screed.
Stone finish applied ‘by object’ on beams, columns and pergolas is calculated in cubic meters based on dimensions drawn by the user.
In the case of staircases, the Tread, landing and riser is considered to be made of 25mm thick tile, fixed with 25mm screed. For stringers and soffits,the tile finish is considered as a 19mm cladding fixed with 12mm screed. Quantities for tiles are always calculated as area, and for screed in volume.
7. Wood
On being ‘applied by object’, the structure of walls is changed to wood of 200mm thickness.
On being ‘applied by face’ on walls, beams, columns and pergolas, the wood finish is considered as a 12mm wooden cladding fixed with a 12mm support. Wood applied ‘by object’ or ‘by finish’ on slabs and flooring are considered to be 12mm wooden tiles fixed with 19 x 19 mm purlins onto an existing slab. Quantities are calculated for both in sqm. Beams are excluded in this case.
Wood finish applied ‘by object’ on beams, columns and pergolas is calculated in cubic meters based on dimensions drawn by the user.
In the case of staircases, the Tread/ Landing and riser is considered to be made of 12mm wood planks, fixed with 2mm metal plate. The stringer is considered to be a 38x150mm section with quantities calculated in running length. The soffits are considered to be made of 19x150mm wooden sheets.
8. Brick
On being ‘applied by object’ on walls, since the default structure of the wall is already brick, when the material brick is applied, the finishes are removed, and the wall is considered as an exposed brick wall of 200mm thickness. Whereas, on being ‘applied by face’ on walls, beams,columns and pergolas, it is considered as cladding.
On being ‘applied by object’ to slabs, bricks are considered to form a brick vault or dome of thickness 100mm.
On being ‘applied by finish’ to slabs, brick tiles are considered to be of 20mm thickness and fixed with 19mm purlins onto an existing slab.
Brick finish applied ‘by object’ on beams, columns and pergolas is calculated in cubic meters based on dimensions drawn by the user.
In the case of flooring and staircase treads, risers and landings, application of the material brick is considered to be 100mm brick or ceramic flooring tile fixed with 50mm screed. The stringer/soffit is considered as a 19mm cladding fixed with 12mm screed. The quantities are calculated for both in sqm.
Tweak these materials in the BIM model to reflect how the structure is actually going to be constructed to get the most accurate estimates. Use these to create reliable budgets and impress your clients!
Disclaimer: No copyright infringement is intended. Please write to smita@snaptrude.com for any dispute.

